Showing posts with label Stern Rake Productions. Show all posts

Friday, September 22, 2023

Pass in Review: Lord of the Rings Monopoly


 It must be more than half-a-century since I last played Monopoly.  And this was back when there was only one version.  The game debuted in 1935, and has spawned a slew of variant editions, starting in the late 20th Century.

One of my grandsons recently received a Boba Fett Edition for his birthday.  
Our respective grandkids are now advancing beyond the Candyland/Chutes & Ladders level of games.  So when I expressed interest about joining in the gameplay, my wife took this as a cue to buy me a Lord of the Rings Edition for my birthday.

The game comes in a hefty cardboard box, with cover art that evokes images of Peter Jackson's Lord of the Rings (LotR) movies.  The gameboard is matted and sturdy.  The money tokens are small, cardboard coins that come in 1 & 5 denominations, known as M .  It took me a while to discover just what an is.  It stands for "Monopole," which it seems has been the case for years.

Funny, I always thought it was "dollars."

Anyway, back to the gameboard.

Starting in the middle, there are a series of circles that track the progress of bearing The One Ring to Mount Doom from whence it was forged.  


The fringes of the game board is a colorful arrangement of locations using images from the LotR films, that players move their tokens around on.


 But beware, the Eye of Sauron, depicted on the two black 1d6s that players use to determine how far they go.  If a Ring Bearer rolls the Eye of Sauron, he must drop the ring where his playing piece landed.  Otherwise, the symbol is a regular "1."


The Ring Tracker Token advances up the slopes of Mount Doom every turn a player possesses The Ring.  

If a player loses The Ring, or gives it away, he has to pay the amount shown in the circle, and the Ring Tracker Token slides back to the bottom. 

The player currently bearing The Ring will be immune from paying rent, going to jail , or pay the fine if he lands on the Gollum or Ringwraith squares.  However he will be affected by Quest Cards, like every other player.  Quest cards often demand additional actions from the player who drew it.

Otherwise, the game is played like the original Monopoly; buy/selling properties, etc. 

The game can be won by the traditional means of bankrupting your opponents, or if the Ring of Power is destroyed.  The game ends immediately when The Ring is destroyed, and the player with the most money and assets wins.

Here's a look at the storage tray and rulebook:


A close-up of the storage tray containing the player tokens, buildings, currency and Quest Cards:


Instead of Houses and Hotels, players build Outposts (brown), or fortresses (white):


There are 9 player tokens, each representing a member of the Fellowship of the Ring.  From left to right: Gandalf, Aragorn, Boromir, Legolas, Gimli, Frodo, Samwise, Merry and Pippin.  However, the game is for a maximum of 6 players.


Here's a close-up of Frodo bearing The Ring, and Samwise:


What I found odd was the game using the traditional names and images for the corner squares--

--Go,

--Go To Jail,


--Free Parking,


--and In Jail/Just Visiting.


I mean, there's free parking's available at the Black Gates of Mordor?  Who knew?

Now I must admit, I'm an immersion gamer, and found the lack of LotR-appropriate images to be a bit jarring.

So I set out to remedy this.

Using my Comic Life program and PowerPoint, I made alternate corner spaces from images I found online.  (Since the game already utilizes movie images, and I'm not selling this as a product, I should be okay with copyright issues).

Anyway, legalities aside, here are my corner spaces--

--Imprisoned (The Secret Passage), replacing In Jail/Just Visiting,


--Captured! replacing Go To Jail,


--The Gifts of Galadriel, replacing Go, where players collect 2  M , and 


--Hiding From The Enemy, replacing Free Parking.


On a lark, I added one final touch.


I thought the cardboard coins were a bit wimpy looking.  And fake game money is expensive.

Fortunately, I came across a company that made coins for half the price of their competitors.  (I'm sorry, I can't remember who they are).

So I bought two packages each consisting of about 10, gold, silver and copper coins.  They come in 3 denominations, 1, 5, and 10, marked in Roman Numerals I, V, and X, respectively.

I look forward to playing this game.  When I do, I'll be sure to write an After Action Review (AAR).

Na-Den Pedim Ad

(Elvish for:  Until we speak again).

Monday, October 17, 2022

Return to Blogging and New Gaming Space


(New Gaming/Play Area/Project Workshop Area)

I'm back!  

Sort of.

It's been nearly a year since my last blog post.

My hiatus from the internet was not by my choice.  About now I'm coming up on my One Year "Lungaversary."  For instance, two days ago marked my first anniversary of the last time I worked or drove a vehicle.

From the summer of 2019 until December of 2021, I was battling Idiopathic Pulmonary Fibrosis (IPF), until my lungs collapsed.  In the first week of the Holiday Season, I was hospitalized and had a bi-lateral lung transplant.  Everything fell into place within a few days that needed to be, in order for me to have a transplant.

This was a miracle.  I now have a second lease on Life.

The downside is that I spent 4 months in the hospital, from late November 21 to mid March 22, most of it in the Intensive Care Unit.

I've been in Recovery Mode ever since, and will be for at least several more months.

This has left me with little time or energy to blog.  It took me until mid May to be able to climb stairs, and my daily walks are still limited to about 5 minutes/hour, at most.  My hands shake to a varying degree which makes counter-clipping hard and painting miniatures impossible.

However, my health has improved a bit, thanks to my wife being my 27/7/365 caregiver.  

In addition to taking care of my health needs, she's been working on the house, or coordinating contractors to add improvements and upgrades.

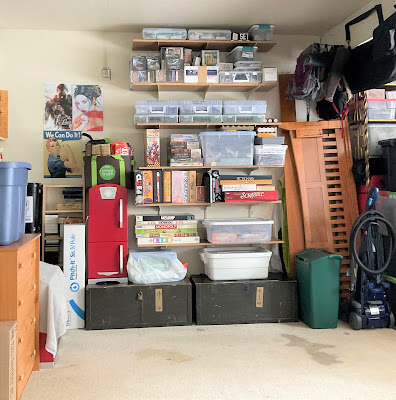
One of the most considerate things she did was clearing out a space in the garage, pictured above, to be used for:  Gaming, a play area for the grandkids, and a workshop area.  My step son hung up a Velcro pile tape along the garage entry, in order to set up a custom-made screen.

Two of my grandkids already tested out the area a couple months ago, playing with a large set of spongy blocks we have.

Since I can't be left alone, my friend Joe, has come over to sit with me, while my wife runs errands, or takes a well-deserved day off with family and friends.

We've utilized this time to binge-watch war documentaries, war movies, and play a long-running game of Admirals' War.

(Cover Art to Admirals' War)

It's a 10-turn game, with each turn representing several months of World War II naval operations.  We started playing in the last week of August.  Since we're new at this game, this session has been more of a learning experience.  Joe manages to visit 1-3 times a week and we squeeze in 1-2 turns each time.

We finished the Movement Phase of Turn 10, and are planning on engaging in the last sea battles of the war later this week.

I didn't take any pics of our game, but my next blog post will be some sort of After Action Review.

Thank you all for your support.


Thursday, July 8, 2021

Pass in Review: Lighthouses for Cruel Seas

(Image from video:  Great Lighthouses in England)

 Lighthouses, the picturesque structures dotting coastlines the world over, date back to antiquity.  

The necessity for safe navigation often over-rode military operations, so there's very little information about the role of lighthouses during wartime. 

In my quick Google search extensive research on this subject, I came across two instances of raids, or attacks directed at lighthouses during World War II:

and the British commando raid against the Les Casquets Channel Island Lighthouse during Operation Dryad.  

But the lack of anti-lighthouse actions didn't stop Warlord Games from providing some colorful terrain to include in tabletop battles.

Here's an example of their "typical Atlantic" lighthouse paint-scheme:

(Image from:  Warlord Games/Product/Lighthouse)

And one with an alternate style:


Two official scenarios include lighthouses, even though they're not the objectives:

Operation Chariot, and 

The Battle of Sukho Island.

Lighthouses in the Mediterranean Sea had a slightly different look, like the Cabo de Palos lighthouse in Spain:

(Image found on Storyblocks)


And here's Warlord Games version of a "typical Mediterranean" lighthouse:
(Image: Warlord Games/Product/Mediterranean Lighthouse)

I bought both styles, feeling I'd need a break from painting and assembling miniature ships.  Both models come in two pieces that can be easily trimmed and superglued.

Compared to painting ships, the conical tower lighthouse was fairly easy...

...the most difficult part being the cupola, lantern panel and gallery as identified by this cut-away schematic:

(Image found on Pintrest)


It took me two attempts to paint these features.  I found it best to wait until I could focus exclusively on specific sections as opposed to attempting to include them in an overall paint job.

The Mediterranean Lighthouse on the other hand was one of the most difficult figures I had to paint, particularly the base.

I rarely use white in my painting projects and I found it an unforgiving color to work with.  I'd mis-stroke painting the window frames, trim and shutters.  This would require multiple coats of white paint to cover up.  

After several coats of touch-up work, I quickly settled for finishing the building at "tabletop quality."

Here's a front view of my finished Mediterranean Lighthouse:


And here's the back view:


I'm not quite done with my lighthouse work.  I currently have a ruined version of the a ruined "Atlantic style" lighthouse, by Warlord Games, and a ruined Mediterranean version on back order.

While I'm satisfied with my work on these, they were difficult enough for me to paint.  So I'll most likely contract-out the job of painting the ruined versions of these two figures to other gamers.

Saturday, May 29, 2021

Pass in Review: Some German Vessels in Cruel Seas, Part 2

(Image from Wikipedia)

 Last month, I had what doctors called a "Life Threatening Event," which made my already shaky health worse for wear.  

Hence the 3-month delay between posts.

While I've weathered this "critical hit," it's made me feel more worn down, plus my days off are often filled with follow-up medical appointments, leaving me with little time to paint my figures.

So I posted several notices on a couple gaming Facebook pages asking for help in reducing my "Mountain of Shame" (unpainted miniatures).  I received a few offers and already delivered a batch of French and Indian War (F&IW) figures to a local gamer for painting.

While I'm trying to contract-out my human-based figures to anyone who'll take them, I find my new-found Cruel Seas project to be within my skill-set and is somewhat therapeutic for me.

But when my helpful fellow gamers are done with all the human-based figures, I'll pass on any Cruel Seas figures I have left.

Until then, I'm still plugging away at my "Drydock of Shame."

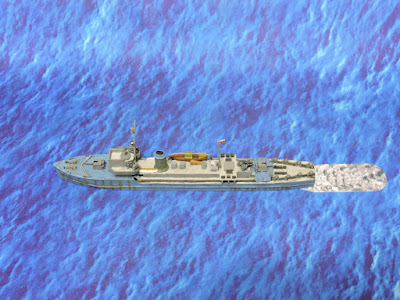
I recently finished four Kriegsmarine vessels, starting with two raumbootes (see example in lead picture). 

Here's an example of how the folks at Warlord Games painted them...

(Image from Warlord Games)


...and here is one of the two vessels I painted:


I made some minor alterations to the color-scheme in order to distinguish between the two vessels.

I thought these vessels were patrol boats.  It wasn't until I was trolling the internet thoroughly researching the topic, that I discovered they were originally intended as small minesweepers.

Speaking of minesweepers, the next vessel I finished was the M-Class Minesweeper.

(Image from Wikipedia)

Here's the Warlord Games paint-scheme...

(Image from Warlord Games)

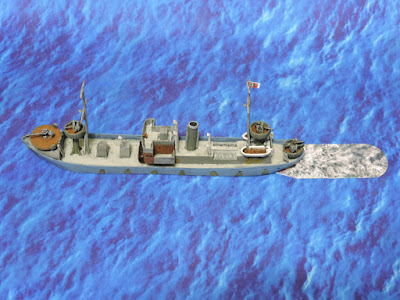
...and here's mine:


The last of this current lot is the Vorpostenboot, or "flakship."


(Image from Wikipedia)

My skills haven't advanced to the point where I can paint Dazzle Camouflage, like this...

(Image from Warlord Games)

...but I can at least make my vessels look like grungy, rusty messes, like this:


I settled on using Army Painter Wolf Grey for the vessels' hulls, with Ash Grey for the metal decks and Reaper Miniatures Harvest Brown for wooden decks.  Other shades of Army Painter grey were used for funnels, towers, smoke stacks, and superstructures. 

Normally, I don't do any paint-mixing.  But for the ships' weaponry, I mix Army Painter Gun Metal with Matte Black, for a blackish-metallic look. 

For a "realistic" look I photoshopped over the data and printed material on the wake/speed templates. 

I still have several E-boats that I'm still working on, along with a variety of allied landing craft from GHQ.  

Hopefully, I'll get my next post uploaded in under 3 months.

Saturday, February 6, 2021

Comics from "Hijacked" Photos


Most of my posts contain photos of game sessions that I took myself.  

However, with all the on-line "rabbit holes" I venture into, I often come across photos from other gamers that trigger my imagination to write a webcomic or a "5 Second Flick."

I'm leading off today's post with a webcomic I concocted from one of the last pictures from my friend Tim's Indochina game session from a couple years ago. I finally got around to hijacking utilizing it, when I thought of an amusing plot hook for the encounter. 

(Note:  Even though I don't profit from utilizing other people's pics, I first try to ask their permission to use them.  If I can't contact them, I'll at least cite the source).

A couple weeks ago I stumbled across a couple gems from some of the Facebook gaming groups I belong to. 

The first is from Dean B.'s Normandy 1944 scenario of a Bolt Action game session:


I thought this was a great image to paraphrase General Blumentritt's exasperation in the film, The Longest Day

The second photo is from a guy calling himself "Otty." 

He's been posting pictures in the Wargaming in Middle Earth Facebook Group, about the figures he's converting from other fantasy wargames into Middle Earth-suitable troops.

This particular picture reminded me of Lurtz's command to his Uruk-hai in the finale of the film, The Lord of the Rings: The Fellowship of the Ring:


I'm currently in the middle of working on a couple of my own Warhammer 40K picture projects, along with painting my Cruel Seas collection.

In the meantime, I thought these hijacked borrowed pics-turned-webcomics would be a nice interlude until I get my act together until I can write the next in-depth blogpost. 


Monday, February 24, 2020

Shantytown Anyverse


(Image from:  Ashes of Dystopia)
Since I'm a mediocre painter, I'm a big fan of cardboard terrain.

Come to think of it, I'm not much better at assembling pre-painted buildings either.

Which is why I like Runestone Entertainment's Model Card Shanty Town.

While actual shanty towns are, sadly, an all-too common sight in our world, they're often the settings for Dystopian-style games and stories, also known as Crapsack Worlds.

So they can fit anywhere from Terra Firma to a recently terraformed world.

Runestone's Shanty Town currently can be downloaded for $6.95.  But Drive Thru RPG often has sales, or even offers stuff for free.  So check the site as often as you can.

You can either print the material on card stock yourself or take it to a print shop.  (There's a local print shop I like going to because their card stock is sturdier and their ink better quality).

This particular product comes in a PDF format and is 23 pages long.  This includes assembly instructions and various Building Templates (white paper "frames") and Texture Templates (exterior) in the following scales:  28 mm, 20 mm (1/72), 15 mm (1/100), and 1/144th.

Not all the Exterior Templates fit completely over the walls and roof.

This is deliberate in order to give buildings that slap-dash, scavenged look.

I assembled 9, 28 mm buildings.

First, are some "public buildings," which could be stores, warehouses or dive-bars.

 Here's the front view:


Here's the right-side view of the "general store," (first building on the left), and the rear views of the other two buildings.


The left-side view of the "general store," along with rear views of he other two buildings.  (Their sides are just plain walls with no unique features).


Next are some "private buildings," which could be dwellings, or storage facilities.

Front view:


Rear view:


Once again, the side views are plain walls with no unique features.

The last three buildings are small sheds.

Front view:


Rear view of the first two buildings:


While I question my skills at assembling cardboard models, I liked how these structures turned out because they're suppose to look decrepit.